Desktop automation for DaVinci Resolve
Your spreadsheet is now a render queue.
Resolve Automation Render Pipeline connects to a running DaVinci Resolve session, reads an Excel spreadsheet row by row, updates your Fusion text, voice-over audio, BG_V1 background video, and Logo_Pic overlay image, and renders each version automatically. By 1LineArt Studio.
See it in action
Four tabs, one render queue
Every screenshot below is the real interface. Connect to Resolve, map your Excel columns to Fusion text, let voice-over audio, BG_V1 background video, and Logo_Pic overlay image resolve themselves from the spreadsheet, then render the whole batch.
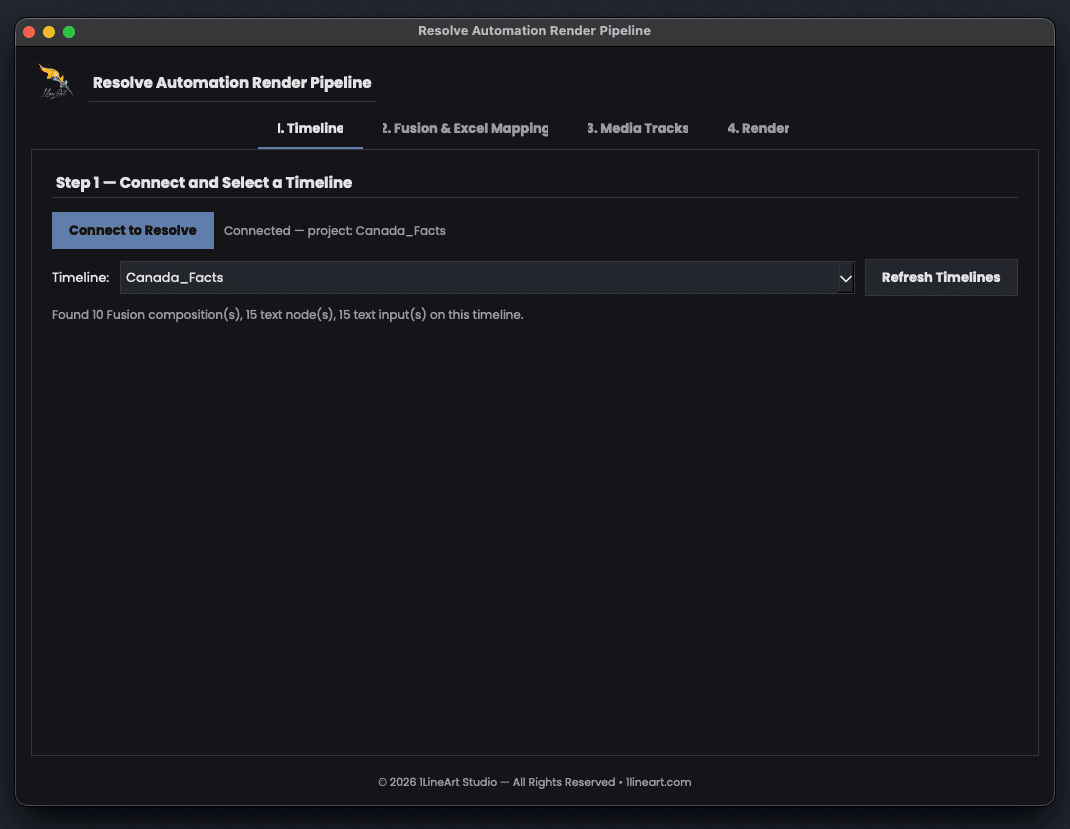
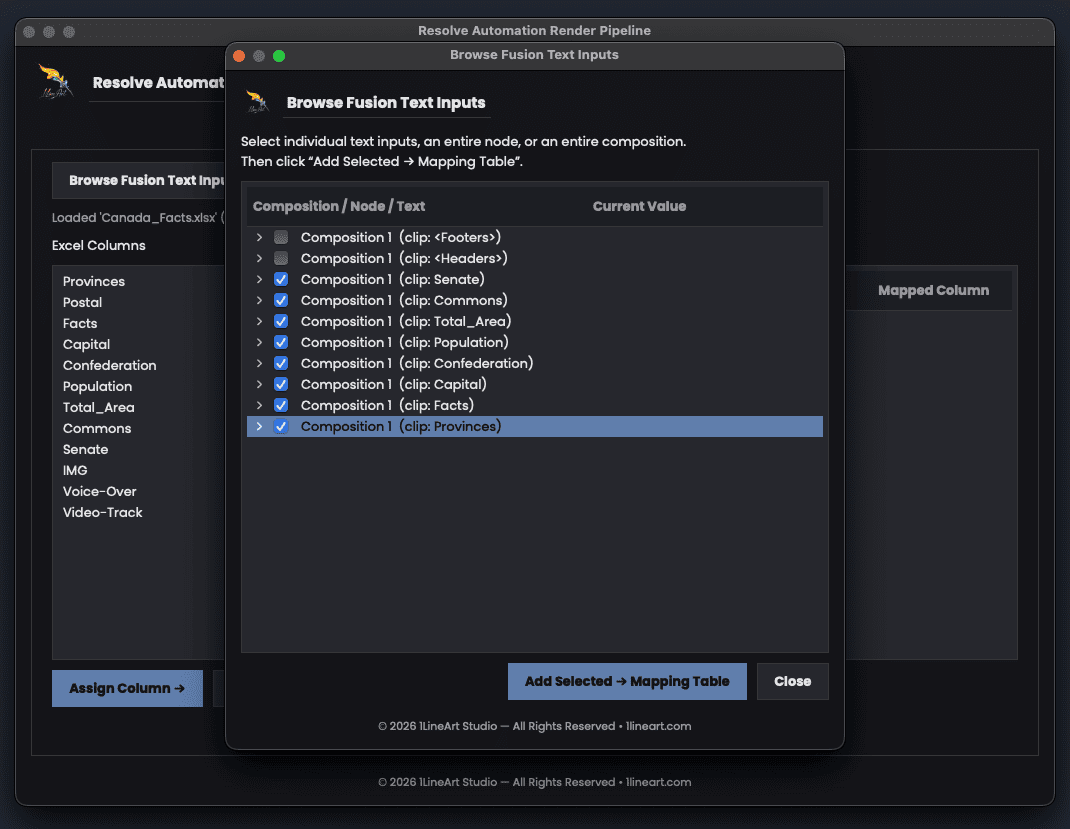
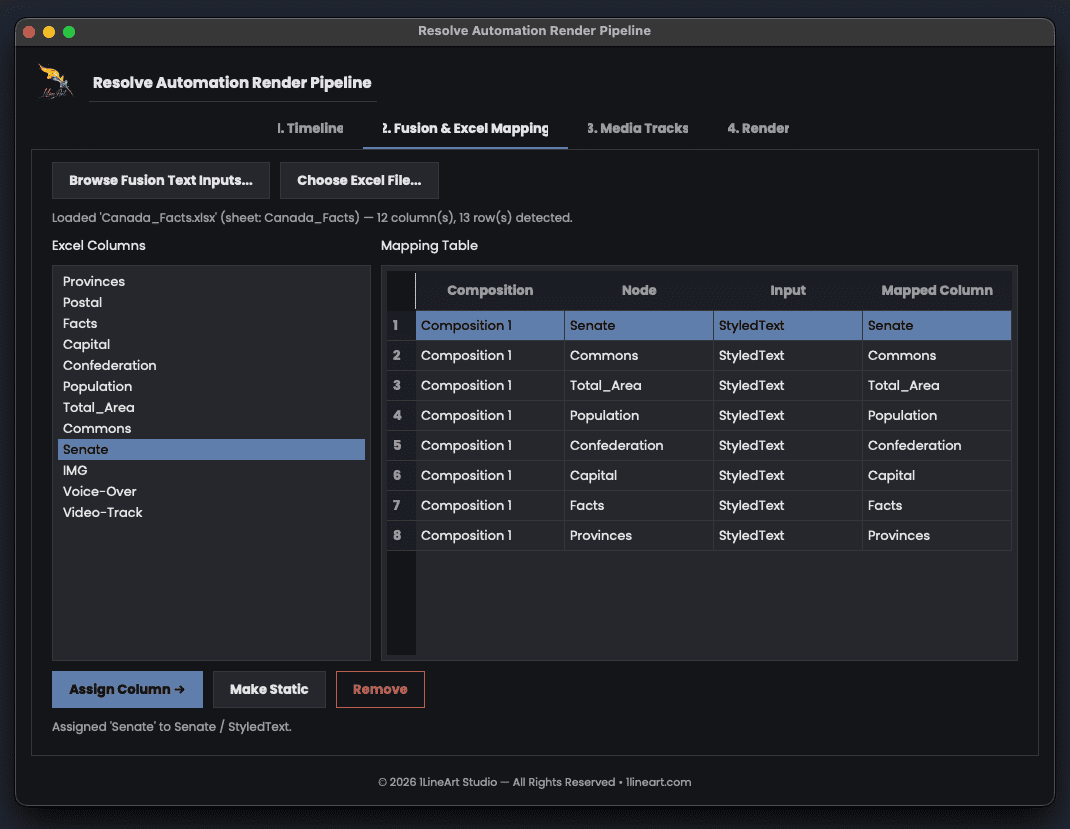
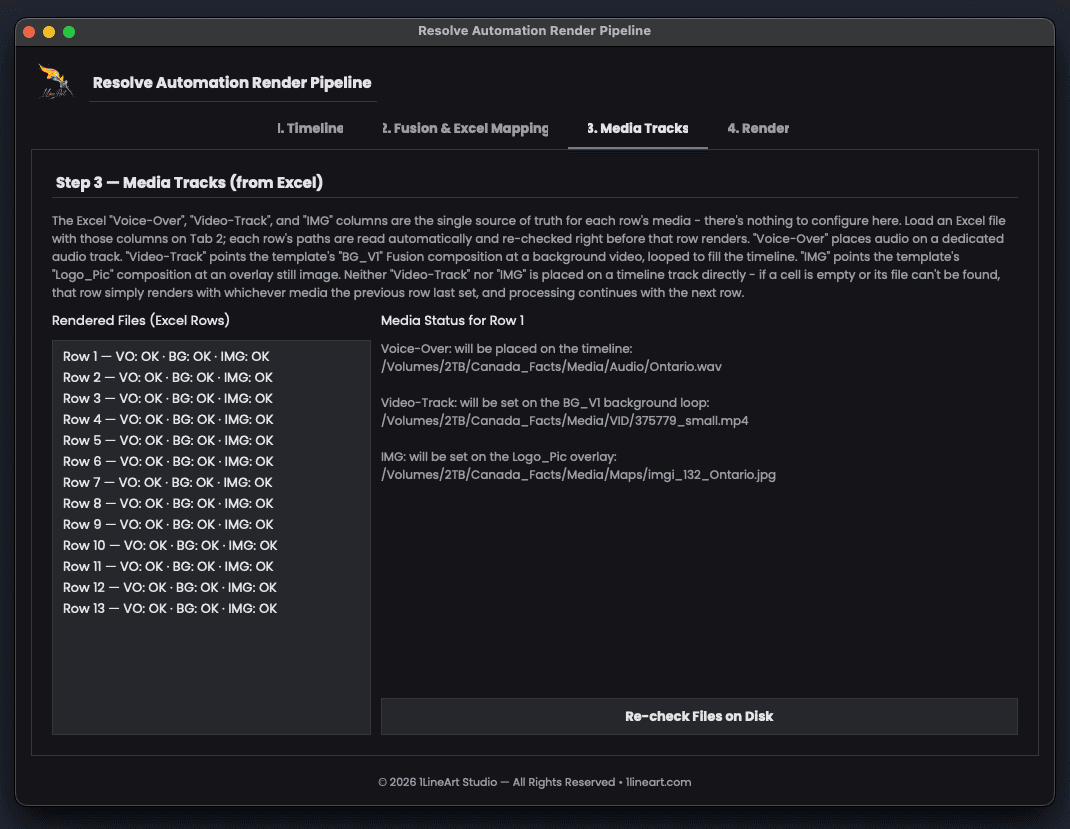
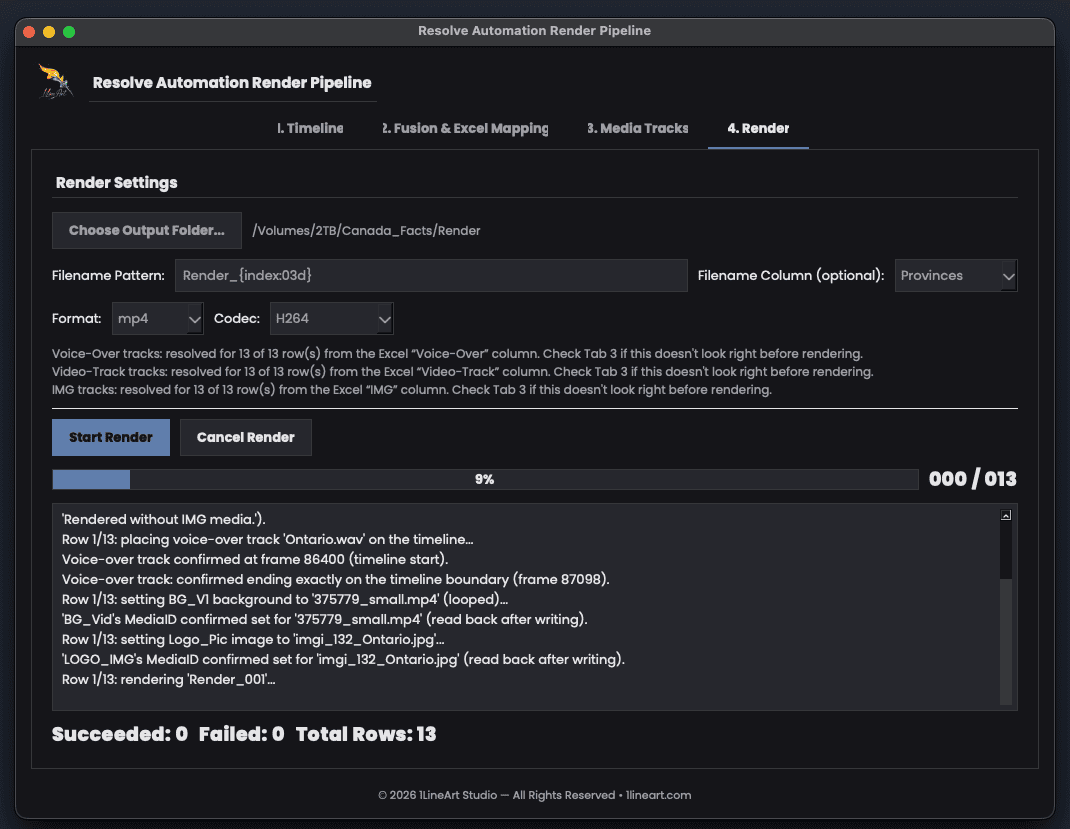
The same Excel row drives everything at once — Fusion text, voice-over audio, BG_V1 background video, Logo_Pic overlay image, and the output filename — so one spreadsheet is the only thing you maintain between renders.
What it does
Built for high-volume, personalized video
Seven things it handles automatically, so you're not reopening Resolve's UI between every render.
No fixed template
Works with your own project, timeline, Fusion compositions, and text nodes — nothing to rebuild around the tool.
Excel-driven Fusion text
Every mapped text input updates automatically from its Excel column before each render, row by row.
Voice-over from one column
Add a "Voice-Over" column with a file path per row; the audio imports, places at 00:00:00:00, and loops to fill the timeline automatically.
Video-track from one column
Add a "Video-Track" column with a video clip path per row; it's imported into the Media Pool and linked to the template's "BG_V1" Fusion composition, looped to fill the timeline just like voice-over.
Continues past failures
A missing file or empty cell just carries over the previous row's media instead - one bad row never stops the batch.
Smart filenames
Build output filenames from a pattern and any Excel column, like Render_{index:03d} or
a per-row title.
Full render reports
Every run writes a CSV, a JSON, a summary text log, and a full diagnostic log — each row's status, filename, voice-over, video-track, and IMG outcome.
Reference
Status codes & report files
Three things worth knowing before your first batch run.
Voice-over, video-track & IMG status (Tab 3)
| Status | Meaning |
|---|---|
| OK | File found — will be used for this row (placed on the audio track, or linked into the matching Fusion node). |
| no path in Excel | The row's Voice-Over, Video-Track, or IMG cell is empty. |
| file not found | A path was given, but nothing exists there. |
| no column | The spreadsheet has no column named exactly "Voice-Over", "Video-Track", or "IMG". |
Where each column goes
| Column | Accepts | Destination |
|---|---|---|
| Voice-Over | Audio file path | Dedicated "Voice Over (Automation)" audio track |
| Video-Track | Video clip path | Imported into the Media Pool, linked to "BG_V1"'s "BG_Vid" Media In node (looped) |
| IMG | Still image path | Imported into the Media Pool, linked to "Logo_Pic"'s "LOGO_IMG" Media In node |
Render reports (written after every batch)
| File | Contents |
|---|---|
| render_report.csv | Row, filename, status, detail, voice-over outcome, video-track outcome, and IMG outcome — spreadsheet-friendly. |
| render_report.json | The same data, machine-readable. |
| render_log.txt | The summary text log of the entire run (one line per row). |
| automation_log.txt | The full diagnostic log, including the specific reason behind any failed Media In update. |
Template requirements
⚠️ Important Instructions
Video-Track and IMG don't get placed on a timeline track directly - they update specific Fusion nodes inside two specific compositions. Your Resolve project has to be built to match these exact names for the automation to find them. None of this depends on what your spreadsheet is actually about - the same structure works for any large-scale batch of video productions.
A clip named BG_V1 and a clip named Logo_Pic must exist on the timeline. "Video-Track" points BG_V1's BG_Vid node at a background video, looped to fill the timeline. "IMG" points Logo_Pic's LOGO_IMG node at an overlay still image. "Voice-Over" places audio on a dedicated audio track (A11) - if the media is shorter than the timeline, it loops to fill the full duration; if longer, it's trimmed to match the timeline exactly. If a cell is empty or its file can't be found, that row simply renders with whichever media the previous row last set, and processing continues with the next row.
 Timeline structure & required setup
Tracks read bottom-to-top like any Resolve timeline. Two clips carry the automation; everything above them is your own layout for whatever each production needs to show, mapped separately on Tab 2.
| Track | Clip | Role |
|---|---|---|
| V1 |  BG_V1 BG_V1 |
Background video composition - updated by Video-Track |
| V2 | BG_0 | Base background layer, untouched by the automation |
| V3 |  Logo_Pic Logo_Pic |
Overlay image composition - updated by IMG |
| V4 and up | Your own text/graphic compositions | Whatever each production needs to display, mapped to Excel columns on Tab 2 |
 A11 A11 |
(created automatically) | Dedicated narration track - updated by Voice-Over |
| A1, A2... | Your own background music/SFX | Untouched by the automation |
 Clip naming & organization
- The background video clip on V1 must be named exactly BG_V1.
- The overlay image clip must be named exactly Logo_Pic.
- Every other clip - text compositions, base background, headers/footers - can be named however you like; only the two names above are looked up directly.
- Keep BG_V1 and Logo_Pic spanning the full timeline length, since that's what each one loops or holds against.
Fusion node naming conventions
Inside BG_V1:
Inside Logo_Pic:
BG_Vid and LOGO_IMG (highlighted above) must be named exactly that - they're the Media In / Loader nodes the automation writes each row's file path into. The surrounding nodes (Transform, Merge, Background, MediaOut) can be built however your template needs; only the two highlighted node names matter to the automation.
 Excel sheet header titles & required format
Three column headers are fixed and reserved for the automation; every other column in your sheet is free-form and gets mapped to a Fusion text input on Tab 2 - whatever each row of your production needs to show.
| Header (exact) | Required format |
|---|---|
| Voice-Over |
Full path to an audio file, one per row |
| Video-Track |
Full path to a video file, one per row |
| IMG |
Full path to a still image file, one per row |
Every other column is whatever your own production needs - map each one to a Fusion text input on Tab 2. Header text is matched exactly, so keep spelling, capitalization, and hyphens identical to the table above.
Setup
Set up in a few minutes
A standalone desktop app that connects to a running Resolve session — nothing to install inside Resolve itself.
-
Install Python
Python 3.9+ (64-bit) is required.
-
Install dependencies
From the application folder:
macOS/Linuxpython3 -m pip install -r requirements.txtWindowspython -m pip install -r requirements.txtIf macOS shows an
externally-managed-environmentor permission error, add--userto the command above. -
Enable Resolve scripting
In DaVinci Resolve: Preferences → General → External scripting using → Local. Restart Resolve after changing this setting.
-
Open your project and launch the app
With DaVinci Resolve open and your project loaded, run from the application folder:
macOS/Linuxpython3 run.pyWindowspython run.pyIf a required package is missing, the app shows the exact install command instead of crashing with an unclear error.
Optional: the interface is designed around the Poppins font. If it isn't installed, the app automatically falls back to your system font — nothing else to configure.
Usage
Working with each tab
The same four tabs shown above, walked through in order.
- Click Connect to Resolve, then select your timeline.
- Review the detected Fusion compositions, text nodes, and text inputs.
- Use Refresh Timelines if you add or rename timelines after connecting.
- Click Browse Fusion Text Inputs... and select the compositions, nodes, or individual text inputs you want to control.
- Click Add Selected → Mapping Table, then choose your
.xlsxspreadsheet. - Select a mapping row and its corresponding Excel column, then click Assign Column.
- Click Make Static to leave an input unmapped and keep its existing Fusion value for every render.
- Double-click a mapping row any time to quickly assign, change, or clear it.
- Add a column named exactly Voice-Over (audio file path), Video-Track (video clip path), and/or IMG (still image path) to your spreadsheet, one path per row.
- There's nothing to configure in this tab — every row's status for all three columns is read automatically and re-checked right before that row renders.
- Use Re-check Files on Disk after adding a file that was previously missing.
- Voice-Over places audio on a dedicated audio track; Video-Track sets the template's BG_V1 Fusion composition to that row's clip (looped); IMG sets the template's Logo_Pic composition to that row's image. Neither Video-Track nor IMG is placed on a timeline track directly.
- A row with an empty cell or a missing file simply renders with whichever media the previous row last set - it isn't cleared or left blank - and processing continues with the next row.
- Click Choose Output Folder... and set your filename pattern.
- Optionally select a Filename Column to include a spreadsheet value in every filename.
- Confirm the format and codec — defaults to MP4 / H.264 — and check the voice-over summary line.
- Click Start Render. The progress bar, counter, and log panel track each row as it renders.
- Cancel Render stops the batch after the current row finishes.
The default filename pattern Render_{index:03d} produces
Render_001, Render_002, Render_003, and so on.
Questions
Frequently asked
No — it's a standalone desktop app that connects to a running Resolve session over Resolve's own scripting API. Open your project in Resolve first, then connect from the app.
Any edition with scripting enabled — check Preferences → General → External scripting using is set to Local, then restart Resolve.
That row simply renders with whichever media the previous row last set - nothing is cleared or left blank, and a missing file never stops the rest of the run.
Neither is placed on a timeline track. Video-Track sets the template's "BG_V1" Fusion composition's "BG_Vid" Media In node to that row's video clip (imported into the Media Pool first), with Loop enabled so a shorter clip fills the timeline. IMG imports that row's still image into the Media Pool the same way and links it to the template's "Logo_Pic" composition's "LOGO_IMG" Media In node. Both compositions already exist on your template timeline — only the Media In node inside each is repointed per row, the same way a Fusion text field is repointed on Tab 2.
No — since Video-Track and IMG only edit nodes inside the "BG_V1" and "Logo_Pic" compositions respectively, any other Fusion composition or text overlay on your timeline is untouched.
Yes — leave that mapping row static instead of assigning it a column, and it keeps its existing Fusion value for every row.
It defaults to MP4 / H.264. The full list of available formats and codecs follows your Resolve installation and license — check the Deliver page if a list looks short.
Turn your next spreadsheet into a finished render queue
Connect it to your open project and it's ready for its first batch in minutes.